Fix MSI Laptop Battery

The battery in your MSI laptop is an important component as it provides the power that makes your computer usable. As a result, it’s only natural to want to learn more about it. If you find yourself getting frustrated with your MSI laptop each time it refuses to work due to a dead battery, there are a few easy methods you can use to help you get back on track and power up your MSI laptop again. To make sure that you get more out of your battery, here are some easy ways you can use to fix the MSI laptop battery.

What causes a damaged MSI laptop battery?

Below are the reasons:

1. Unreliable electricity supply

The most typical signs of a bad power supply are broken or damaged power outlets. It’s not always a good idea to use a damaged or defective power source because it could deliver lower activation energy to your MSI laptop, which could harm the battery and adapter over a period.

2. Malfunctioning Battery Driver

The effective operation of your MSI laptop depends heavily on the installed drivers. In this case, installing your battery controllers appropriately is necessary before your power pack can effectively charge your computer.

3. A defective battery

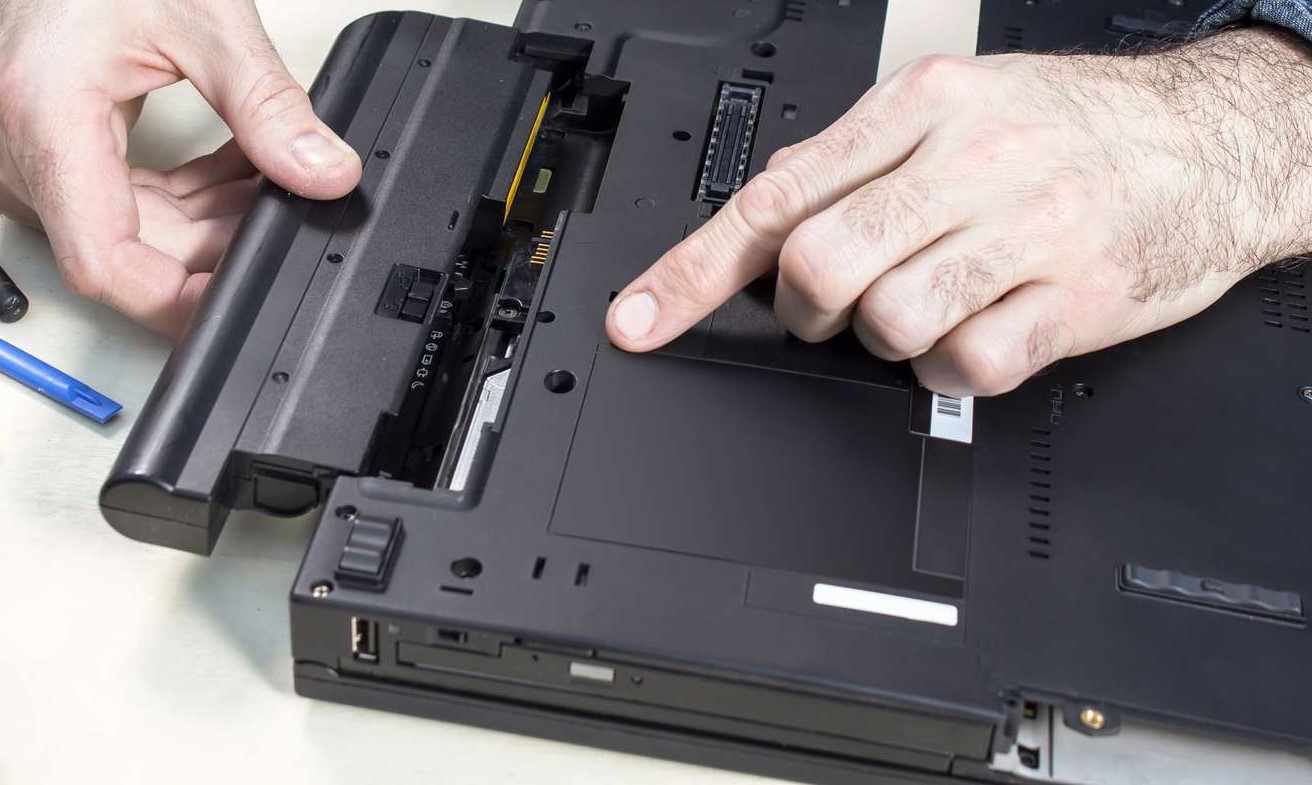
The lead detective in the mystery of why your MSI laptop won’t charge when plugged in is the battery. Your battery may be defective if it won’t charge when you connect to your MSI charging cable. Remove the battery from your MSI laptop and inspect it for swelling or fluid leaks to determine if your battery is defective.

4. A damaged charger

When you need your charger to power your MSI laptop properly, it must be in excellent shape and play a crucial role in your life. Your MSI computer won’t charge if the charger is full or partially broken, and the only method to fix the problem is to buy a new charger.

How to Fix MSI Laptop Battery?

Examine the area to see what else contributes to the issue if your MSI battery is not charging. The “Hybrid Power Supply Function” or the “Dragon Center/Creator Center Setting” on your device should be checked again if it has been confirmed that there is no problem with the surroundings outside.

1. Transform the Power Plan

You can choose from 3 different power plans for your computer.

  • Balanced
  • Energy-saving
  • Performance-based

Changing between these power options can significantly alter the situation, and your MSI laptop will once again begin charging regularly.

How? Read on.

  • Perform a right-click on the taskbar battery icon.
  • Choose Windows Mobility Center in step two.
  • Pay close attention to the area that features the battery icon.
  • Select the balanced, energy-efficient, or excellent performance mode.
  • Keep in mind that your MSI laptop is charging as you go between each mode.

2. The role of a hybrid power supply

The MSI laptop is designed to prioritize the system supply of power. When operating a demanding 3D program, the CPU and GPU are significantly loaded, and energy prioritizes the system power supply. When the CPU and GPU loading is lessened, battery charging stops, and AC energy starts up again. That’s only natural.

On MSI laptops, hybrid power may be present. When the CPU and GPU are working hard, the system will start mixing battery voltage and AC source, enabling the CPU and GPU to overdrive for an extended period. People can play several major games in improved conditions thanks to this feature.

3. Setup for the Dragon Center/Creator Center

Visit “Dragon Center” to examine the configuration if your MSI laptop won’t charge to 60% or 80%. Press “MSI Dragon Center” in Begin to display the battery usage. Start the “MSI Dragon Center” program to view the status of the current battery settings. Click the circle next to the long-term use choice if the battery is currently set to optimum management or maintenance.

A wheelchair’s battery gives the device movement, but it weighs much more than a laptop. As a result, there is no issue with the battery being too hefty for your requirements while it is constantly charged at 100%.

If the battery is fully dead, start charging it when it is less than 70% charged and quit when it reaches 80%. The battery should be charged until it reaches 60% when it is less than 50% full to facilitate quick charging.

Warning

Do not keep the charger connected when your laptop is not being charged. The battery will degrade as a result of this. It’s crucial to look after your battery. Remember to avoid using the charger to charge your laptop while it is powered on. Utilize the charger only after disconnecting the battery.

The majority of current laptops can function while being constantly plugged in. Their battery won’t be damaged in this way. But before you unplug the charger, remember to switch off your laptop.

How To Repair An MSI Laptop That Does Not Charge When Plugged In?

  • Reset the CMOS memory
  • Remove drivers
  • Upgrade Battery Drivers
  • Modify the strategy for adjusting the power settings.
  • Windows Update

Final Words

When connected in, the MSI laptop is not going to charge. Now what? Some of the most frequent causes of this problem have been discussed, along with solutions. 

Please note that the guideline instructions provided may not always apply to the symptoms your computer is experiencing. Sometimes, symptoms or behavior can be the same, but the underlying reason or fault can be completely different.

The fastest way we can assist customers is by bringing computers to our workshop, where technicians have the tools to diagnose faults accurately. After checks, if parts are found to be faulty or damaged, we proceed to replace them with high-quality original parts.

No appointments are required; you can drop off your computer at our workshop during working hours.

If you have more queries about our laptop repair and upgrade services, please feel free to contact us at 020 7018 7490 or email us at contact@pcfixlondon.com

MSI GT72 6QD Dominator Gaming Laptop

Are you experiencing problems with your MSI GT72 6QD Dominator Gaming Notebook? Are you looking for useful information about how to Upgrade your MSI GT72 6QD Dominator Gaming Laptop? Upgrading your MSI GT72 6QD Dominator Gaming Laptop is a great way to boost performance and usability. Check out the article below for a step-by-step guide on upgrading the RAM and hard disk drives on the MSI GT72 6QD Dominator Gaming Laptop.

Features of MSI GT72 6QD Dominator Gaming Laptop

It’s The Dominator again. MSI’s gaming laptop series has experienced a considerable internal makeover to create the GT72 Dominator Pro, which took full advantage of Nvidia’s powerful new Maxwell visuals. This laptop includes an Nvidia 980M GPU, four lightning-fast SSDs, top-notch audio, and one of the nicest bespoke keyboards available. The combo is strong and well worth the effort; however, the display may be better.

Inside, MSI took a little more modest tack by largely cladding the deck in black metal. If you watch carefully, you can see red, glossy plastic designed to hide the aluminum of the microphone grille at the top of the deck. On the left side of the keyboard, the deck is keying for the SteelSeries Engine control unit, energy, GPU, cooling, and XSplit Gamecaster.

How To Upgrade MSI GT72 6QD Dominator Gaming Laptop?

The MSI GT72 6QD Dominator Gaming Laptop is an excellent choice for gaming and overclocking. It has been designed with many features that make it stand out from the crowd. However, if you want to get more out of this laptop, you might need some upgrades. This article will show you how to upgrade your MSI GT72 6QD Dominator Gaming Laptop.

Disassemble the PC Case

To upgrade MSI GT72 6QD Dominator Gaming Laptop, you will need to disassemble the PC case.

  • Remove the battery. To do this, turn the laptop upside down and remove the screws with a screwdriver.
  • Pull out the battery carefully by prying it from its compartment with a flathead screwdriver or something similar.
  • Remove the DVD drive by unscrewing four screws.
  • Unplug all cables connected to the motherboard and pull out the hard drive cage using your fingers.

Remove the HDD Caddy Cover

The first step is to remove the HDD Caddy Cover.

  • Press the button on the left side of your laptop, then slide down the cover to reveal the HDD Caddy.
  • Remove two screws from both sides of the HDD Caddy Cover, then lift and remove it.
  • Push-out two pins at both sides of your laptop case with a pin remover tool or any pointed object, then unplug two cables underneath the laptop case.
  • With a screwdriver, unscrew four screws on both sides of your MSI GT72 6QD Dominator Gaming Laptop and remove them carefully with a screwdriver or other pointed object, such as tweezers, from beneath your MSI GT72 6QD Dominator Gaming Laptop.

Upgrade RAM

  • Unplug all the power cables and remove the battery.
  • Remove all screws from the back and bottom cover, then remove all screws on the bottom of your laptop.
  • Open both sides of your laptop, then slowly lift the keyboard panel to separate it from the palm rest and display assembly.
  • Remove all screws securing your hard drive caddy to the bottom case, disconnect the SATA cable from your hard drive and unscrew two screws securing your hard drive to the caddy.
  • Carefully lift your hard drive out of its slot, disconnect the SATA cable, and remove it completely from your laptop.
  • Insert a new RAM module into the DIMM socket on the motherboard (make sure not to touch gold contacts) and push down until you hear a click sound (make sure it is fully seated in its slot).

Upgrade SSD to M.2 SSD

  • Open the bottom cover of your laptop with a screwdriver.
  • Remove the old SSD from its slot and replace it with the new one. For example, if your laptop has two slots for SATA drives, you can replace the original HDD with an SSD in one slot and then put another SSD in the other slot.
  • Put back all screws and close the bottom cover.

Upgrade HDD to 2.5-inch SSD

To upgrade your MSI GT72 6QD Dominator Gaming Laptop, you need to purchase a 2.5-inch SSD. The easiest way is to find one with the same interface as your current SATA HDD but with a higher capacity. Once you have found one, you can install it yourself or take it to a computer repair shop to have them do it for you.

Reassemble the PC Case

How To Upgrade MSI GT72 6QD Dominator Gaming Laptop: Reassemble the PC Case.

The MSI GT72 Dominator Pro G-1420 Gaming Laptop comes with a few tools that can be used to help you disassemble and reassemble the laptop.

The following are instructions on how to reassemble your PC case after performing upgrades:

  • Remove all screws from the PC case. You will need to use the screwdriver for this step.
  • Unplug all cables from the motherboard, including USB ports, Ethernet cables, power cables, and speaker cables.
  • Remove all components inside your PC cases, such as RAM sticks, CPU fans, hard drives, DVD drives, etc. You should remove any additional fans if you have added them during previous upgrades.
  • Place all removed parts onto a flat surface, so they do not get lost while working inside your system’s case.

Final words

There are many ways to upgrade an MSI GT72 6QD Dominator Gaming Laptop, and it will depend on your budget and how advanced you want the modifications to be. 

Kindly be aware that the guidelines are given for your information only and do not fully endorse handling the upgrade on your own. We strongly recommend taking your laptop to a repair and upgrade center for assistance.

The most efficient way for us to help customers is by having them bring their computers to our workshop, where our technicians have the necessary tools for upgrades.

No appointments are required; you can drop off your computer at our workshop during working hours.

If you have more queries about our laptop repair and upgrade services, please feel free to contact us at 020 7018 7490 or email us at contact@pcfixlondon.com