horizontal-lines-Lenovo

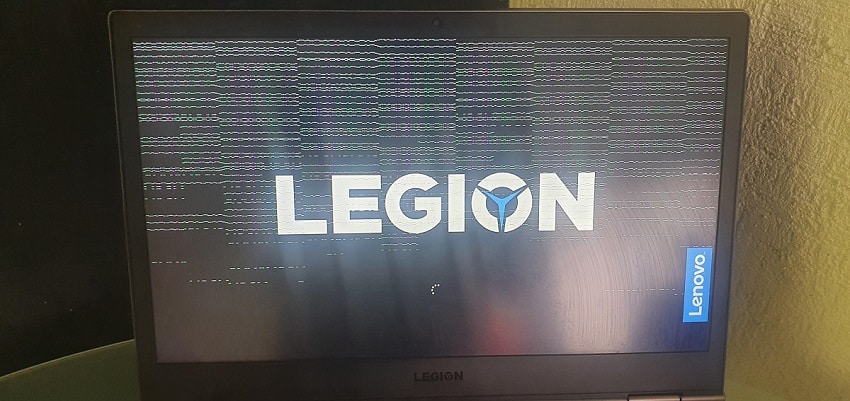
If your Lenovo screen is flickering or covered in horizontal lines, the first thing you need to determine is whether the fault is Software (Drivers) or Hardware (The Screen/Cable). At our Kings Cross lab, we see this issue daily on everything from ThinkPads to Legion gaming rigs. Before you spend money on a new screen, follow our bench-test guide to find the root cause.

Step 1: The “BIOS Test” (The Ultimate Diagnostic)

This is the fastest way to see if your hardware is failing.

  1. Turn off your Lenovo.
  2. Turn it on and immediately tap F1 (or F2 on some models) to enter the BIOS menu.
  3. The Result: * Lines are still there: It’s a physical hardware fault (Screen or Video Cable). Software updates won’t fix this.
    • Lines disappear in BIOS: Your hardware is fine. The issue is a corrupted Windows Display Driver.

Step 2: The “Hinge Flex” Test

Lenovo laptops, especially the Yoga and IdeaPad series, are prone to “cable pinching.”

  • While the laptop is on, slowly move the screen back and forth.
  • If the lines flicker, change color, or disappear at a certain angle, the EDP Video Cable inside the hinge is frayed or loose.
  • Technician’s Note: This is a much cheaper fix than a full screen replacement. We repair these at Sinclair House by reseating or replacing the internal cable.

Step 3: External Monitor Check

Plug your Lenovo into a TV or monitor via HDMI.

  • If the external screen is clear but the laptop has lines, your screen is the problem.
  • If the lines appear on both screens, your Graphics Chip (GPU) on the motherboard is failing.

Conclusion: Get a Professional Assessment at Sinclair House

Horizontal lines are one of the most common issues we handle at PC Fix London. While some software glitches can be fixed with a driver roll-back, most persistent lines are a physical “cry for help” from your hardware.

Don’t spend money on parts you might not need. If your Lenovo is acting up, bring it to our experts in Kings Cross. We’ll perform a real-world stress test, check your internal cables, and give you a straight-talk repair plan that saves you time and money.

Visit us at Sinclair House today—no appointment needed for a quick counter-check.

Lenovo Screen Issues: Frequently Asked Questions

1. Can horizontal lines on a Lenovo screen be fixed without replacing it?

It depends. If the lines disappear when you move the screen (the “Hinge Test”), we can often just replace or reseat the internal EDP cable. If the lines stay perfectly still and never change, the LCD panel itself is likely cracked internally and needs a full swap.

2. Are horizontal lines always a hardware problem?

Not always. If the lines only appear once Windows loads but are gone when you are in the BIOS menu, it’s a driver conflict. We see this often after a Windows 11 update on older Lenovo IdeaPads.

3. Why do the lines change color when I press the edge of the screen?

That is a “vertical/horizontal gate” failure. It means the delicate adhesive holding the ribbon cable to the glass has failed. On modern Lenovo Slim models, this isn’t repairable and requires a new screen assembly.

4. How much does a Lenovo screen replacement cost in London?

Prices vary depending on the model. A standard 15.6″ IdeaPad screen is relatively affordable, while a 4K touch-screen for a Lenovo Yoga or a high-refresh-rate Legion gaming panel will cost more. We provide a fixed quote at our Sinclair House lab before starting any work.

5. Is it safe to keep using my laptop with lines on the screen?

It won’t blow up, but it is a sign of stress. If the lines are caused by a failing GPU (graphics chip), the laptop might eventually stop turning on altogether. It’s best to get a quick diagnostic at our Kings Cross bench before a small problem becomes a dead motherboard.

lenovo laptop

Lenovo is a China-based technology company. They are the biggest selling laptop manufacturer in the whole world. Lenovo released models like Thinkpad and Ideapad. These laptop models have gained more popularity over the years.

Lenovo dominates the work and professionals market by providing value for money laptops. But with the release of the Legion models, the company also entered the gaming sector. Lenovo laptops offer models with different specifications and designs. This makes them qualified to fit any budget slabs. You can pick a Lenovo laptop that can match your lifestyle.

There are some issues in a Lenovo laptop in which the webcam doesn’t work. The device driver in the Lenovo laptop may not be functioning properly, or there may be an issue with in-camera detection. This problem can also be found in other laptops.

In many Lenovo laptops, the settings are the cause of this issue. They turn the camera off to ensure the user’s privacy. Turning the settings off can solve your issue with ease. But sometimes some updates need installing for the camera to work. The following list shows the causes and the solutions that you need to do to solve your camera issues.

How to Fix Lenovo Laptop Camera Issues

Method 1: Choose Camera Privacy Settings

In the windows operating system, settings allow you to choose your privacy settings. This gives the user control over the camera access. You can enable or disable the use of the camera for the different apps installed on your Laptop.
• Click the Windows icon and type “Camera Privacy settings”. Choose the icon that appears on the screen.
• Click on the toggle switch to allow access to all the apps on the Laptop.
• The next menu shows the list of apps installed on the Laptop. Turn on the toggle switch for the apps that you need camera access to.
• Close the window and check if your Lenovo laptop camera is working

Method 2: Update the Camera Driver

There may be an issue if windows have installed the wrong camera driver or the driver needs an update. Check and see if updating the camera driver can solve your camera problems. Follow these steps to update your camera driver:
• Click on the Windows key.
• Search for Device Manager in the Windows search.
• Select imaging device or Camera in the list and double click.
• Find Lenovo Easy Camera from the drop-down list.
• Right-click to reveal the Update driver option and select it.
• Click on search and Windows will automatically scan the internet for pending updates of the driver.

Then click the Update button to install the new update and once installation over click the restart button. After restart check, if the camera is working. Sometimes windows cannot detect the updates for the new drivers. In that case, you can uninstall the camera driver and Install a new one by following the steps given in Fix 3.

Method 3: Reinstall the Camera Driver

The camera driver of your laptop may have corrupted due to the install of a new Windows OS. The conflict with the OS can cause camera issues. Follow these steps to uninstall and reinstall the driver to solve the issues:
• Open the Run command from the Start menu and type “devmgmt.msc” and select Enter.
• Click on Imaging devices or Camera to open your Camera device.
• Right-click and Uninstall the camera device.
• Confirm the Uninstall.
• Restart your computer.
• Select Run command from the Start menu and type “devmgmt.msc” and click enter.
• Now click Action and then search for new hardware devices.
• Windows will detect the camera reinstall the device driver.
• Restart the system and check if the camera is working.

Method 4: Select the Correct Program Settings

Perform this fix when your camera works for some applications but not for others. There needs to be some change in the Program Settings.
• Check for program settings in the windows setting app.
• Select Lenovo Easy Camera as the default camera in the settings.
The change in the Program settings on your laptop can lead you to a working camera.

Method 5: Remove Lenovo Setting Application

This solution acts as the last resort, you can perform this if non of the settings work. The Lenovo settings app can sometimes interfere with the working of the camera of your laptop.
These settings can are governable by windows settings so the app is not required.
Remove the app by following these steps.
• Open Control Panel from the Start Menu.
• Choose the Program & Features Menu.
• Uninstall the “Lenovo Settings Dependency Package” from the list.
• Restart the laptop and check if the camera is working as expected.

Disclaimer:

Please note that the guideline instructions provided may not always apply to the symptoms your computer is experiencing. Sometimes, symptoms or behavior can be the same, but the underlying reason or fault can be completely different.

The fastest way we can assist customers is by bringing computers to our workshop, where technicians have the tools to diagnose faults accurately. After checks, if parts are found to be faulty or damaged, we proceed to replace them with high-quality original parts.

No appointments are required; you can drop off your computer at our workshop during working hours.

If you have more queries about our laptop repair and upgrade services, please feel free to contact us at 020 7018 7490 or email us at contact@pcfixlondon.com

Lenovo Laptop Camera FAQs

Can you deny access to certain software and allow it to others?

If you want the software to not have access to your camera you can follow these steps. They will lead you to the privacy settings of your laptop camera. Search for Camera Privacy settings in the windows search. Then scroll down to the option “Choose which Microsoft Store apps can access your Camera”. You can toggle on or off and select from the list of given apps. These can protect your camera privacy from all the third-party apps downloaded from the windows store. You can also choose to allow access if your camera doesn’t work.

What can I do to fix my blurry camera?

If you have a blurry but working camera you first need to clean your camera lens. Scratches, dust can degrade your camera quality. Any missing updated drivers can also cause blurry camera issues. Performing a Windows or Driver update should solve the problem of a blurry camera. Your antivirus can also prevent your camera from working. Check to see if this is the case using task manager. Scan for changes in the camera and turn them back. Restart your windows to solve the blurry camera issues.

If the given solution doesn’t work we recommend you to call an authorized Lenovo laptop repair service center, they can provide you with solutions specific to your Lenovo laptop model.