Screenshots are useful for capturing and sharing what’s on your computer screen. If you own a MacBook Pro, taking screenshots is a simple and easy process. This guide will walk you through the steps to take a screenshot on your MacBook Pro.
Method 1: Capture a screenshot of the entire screen on the MacBook Pro
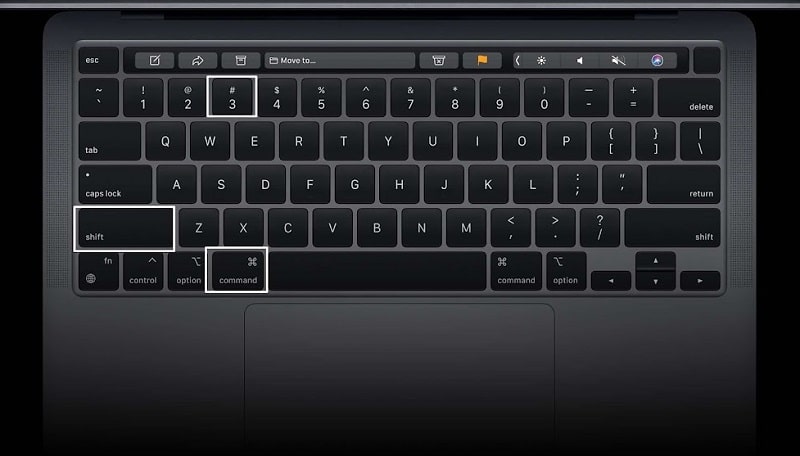
- Press the “Command,” “Shift,” and “3” keys simultaneously. You will hear a camera shutter sound, which indicates that the screenshot has been taken.
- The screen capture of the entire screen will be saved to your desktop with a filename that starts with “Screenshot” followed by the date and time.
- Double-click the screenshot file to open it.
Method 2: Take a screenshot of a selected portion of the screen
- Press the “Command,” “Shift,” and “4” keys simultaneously. The cursor will change to a crosshair symbol.
Click and drag the crosshair symbol to select the portion of the screen you want to capture. As you drag, you will see the dimensions of the selected area. - Release the mouse button to take the screen capture. You will hear a camera shutter sound, indicating that the screenshot has been taken.
- The screenshot will be saved to your desktop with a filename that starts with “Screenshot” followed by the date and time.
- Double-click the screenshot file to open it.
Method 3: Take a screenshot of a specific window
- Click the window you want to capture to make it active.
- Press the “Command,” “Shift,” and “4” keys simultaneously. The cursor will change to a crosshair.
- Press the “Space” key. The cursor will change to a camera icon.
- Move the camera icon over the window you want to capture. The window will be highlighted in blue.
- Click the mouse button to take the screenshot. You will hear a camera shutter sound, indicating that the screenshot has been taken.
- The screenshot will be saved to your desktop with a filename that starts with “Screenshot” followed by the date and time.
- Double-click the screenshot file to open it.
Method 4: Take a screenshot and copy it to the clipboard
- Press the “Command,” “Shift,” and “Control” keys simultaneously.
- The screen will flash white, indicating the screenshot has been taken and copied to the clipboard.
- Open the application where you want to paste the screenshot.
- Press the “Command” and “V” keys simultaneously to paste the screenshot.
In conclusion, taking screenshots on a MacBook Pro is a straightforward process that can be accomplished using various methods depending on the desired outcome. By following the above steps, you can take high-quality screenshots that can be used for various purposes, such as sharing information or troubleshooting issues.
About Bilal
Bilal Tahir is a certified technician with over 20 years of experience in computer hardware repair and IT services. He holds an NVQ Level 4 qualification in Electronics along with industry recognised certifications including Microsoft Certified Systems Engineer (MCSE, 2006) certification number 8A522B-26C1CX and Cisco Certified Network Associate (CCNA). Bilal began his career as a Network Administrator where he developed strong expertise in managing and maintaining IT systems and networks. Over time, he developed a deep interest in hardware repairs particularly component level diagnostics and repair electronics which led him to specialize in advanced motherboard and device level troubleshooting. He has worked across all major laptop and computer brands providing precise reliable repairs. With a strong technical foundation and hands on experience, Bilal is known for delivering high quality solutions for both individuals and businesses.
Write a Comment