ASUS ROG Series laptops are high-performance machines with powerful specifications and excellent gaming capabilities. However, like all electronic devices, they are prone to occasional issues, and a damaged screen is one of the most common problems laptop owners face. The screen is an essential component of any laptop, and a damaged display can significantly affect its usability and performance. This article will discuss the causes of ASUS ROG Series laptop screen damage and why PC Fix London is the best choice for repairing your laptop screen.
Symptoms of a Damaged ASUS ROG Series Laptop Screen:
As a laptop user, there are several issues that you may encounter with your device. One of the most common issues is a damaged laptop screen. It can occur due to various reasons, such as physical damage, water damage, or age-related wear and tear. This article will discuss the symptoms of a damaged ASUS ROG series laptop screen.
Flickering Screen:
One of the most common symptoms of a damaged laptop screen is screen flickering. If your ASUS ROG laptop screen is flashing, it could be due to a loose connection, a faulty inverter, or a damaged screen. This issue can be particularly frustrating as it can cause eye strain and headaches.
Dead Pixels:
Dead pixels are a common issue when there is a malfunction in the screen’s liquid crystal display (LCD). Dead pixels are tiny black or white spots on the display screen that do not change when the laptop is turned on or off. If you notice dead pixels on your ASUS ROG laptop screen, it could indicate a damaged screen or a problem with the LCD.
Distorted Images:
If you notice that the images on your laptop screen are distorted, it could indicate a problem with the screen’s resolution. It could be caused by a damaged screen or a problem with the graphics card.
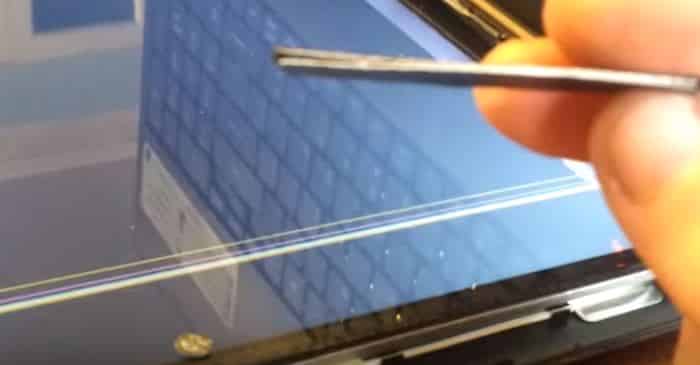
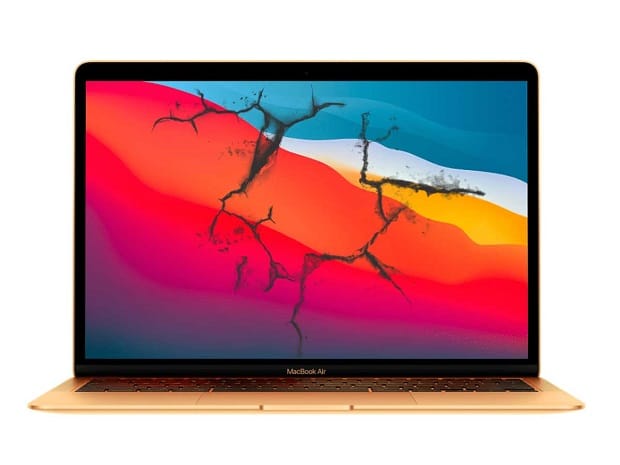
Cracked Screen:
A cracked screen is one of the most apparent symptoms of a damaged laptop screen. If you have accidentally dropped your laptop or hit it against a hard surface, you may have caused damage to the laptop screen. In such cases, the screen will need to be replaced.
No Display:
If you turn on your ASUS ROG laptop and there is no display on the screen, it could indicate a problem with the screen’s backlight or a damaged screen. In such cases, you may hear the laptop’s fan running, but there will be no display on the screen.
There are several common causes of ASUS ROG Series laptop display issues, including:
Physical damage: One of the most common causes of display issues in ASUS ROG laptops is physical damage to the screen. It can occur due to accidental drops, impact, or pressure on the screen.
Graphics card problems: The graphics card in the laptop may experience issues, causing problems with the display. It could be due to outdated drivers, overheating, or a hardware malfunction.
Loose or damaged display cables: The cables connecting the display to the laptop’s motherboard may become loose or damaged, leading to issues with the display. It can happen due to regular wear and tear or accidental damage.
Software problems: Sometimes, software issues can cause problems with the display, such as incorrect resolution settings or compatibility issues with specific applications.
Malfunctioning backlight: The backlight that illuminates the display may malfunction, causing dim or uneven lighting on the screen. It can be due to a faulty backlight component or a damaged power source.t
Loose or damaged cable connections: The cables that connect the laptop screen to the motherboard can become loose or damaged over time, resulting in display issues.
Driver problems: Outdated or corrupted display drivers can cause issues with the screen display, including flickering, pixelation, and colour distortion.
Physical damage: Accidental drops or impacts can cause physical damage to the screen, resulting in cracked or broken displays.
Overheating: Overheating the laptop can cause damage to the screen and other internal components, resulting in display issues.
Malware or viruses: Malware or viruses can cause various issues with the laptop’s performance, including display issues.
It is essential to identify the cause of the display issue before attempting to fix it to avoid causing further damage to the laptop.
To keep your ASUS ROG laptop display in good condition and prevent frequent repairs, you can take the following steps:
Handle your laptop carefully: Be careful while handling your computer, especially while opening and closing the lid. Don’t put unnecessary pressure on the screen.
Use a laptop sleeve or case: Invest in a good-quality one to protect your laptop from external damage during transportation.
Keep the laptop clean: Dust and dirt particles can accumulate on the screen, affecting its clarity. Use a microfiber cloth to wipe the screen regularly.
Adjust the screen brightness: High brightness levels can strain the display, causing it to malfunction. Adjust the screen brightness to a comfortable level.
Avoid exposure to extreme temperatures: High temperatures can cause the laptop display to become discoloured or damaged. Avoid exposing your laptop to direct sunlight or powerful heat sources.
Update your graphics card driver: Outdated drivers can cause display issues. Keep your graphics card drivers up to date.
Avoid liquid spills: Liquid spills on the laptop can cause severe damage to the display. Be careful while using liquids near your computer.
Following these steps, you can keep your ASUS ROG laptop display in good condition and avoid frequent repairs.
ASUS ROG laptop screen damage and repair: Why PC Fix London?
If you’re experiencing ASUS ROG laptop screen damage, you’ll want to find a reliable repair service to fix the issue and get your laptop back in working order. While many repair services are available, PC Fix London offers several benefits, making them an excellent choice for ASUS ROG laptop screen repairs.
Experienced technicians: PC Fix London employs professional technicians who repair many laptop issues, including ASUS ROG screen damage. They have the necessary tools and expertise to diagnose and fix problems quickly and effectively.
Quality parts: PC Fix London uses only high-quality replacement parts for their repairs. It ensures that your ASUS ROG laptop screen is restored to its original condition and that the repair will last a long time.
Competitive pricing: PC Fix London offers the best pricing for their ASUS ROG laptop screen repair services and no fix, no fee guarantee. They understand that laptop repairs can be expensive and strive to offer fair pricing that won’t break the bank.
Quick turnaround time: PC Fix London offers fast turnaround times for laptop repair services. It means you won’t have to be without your ASUS ROG laptop for an extended time and can get back to using it as soon as possible.
Convenient location: PC Fix London is located in the heart of London, making it suitable for those who live or work there. You can quickly drop off your ASUS ROG laptop for repairs and pick it up once the repairs are complete.
Overall, PC Fix London offers reliable and convenient ASUS ROG laptop screen repair options. With experienced technicians, quality parts, high competitive and best pricing, quick turnaround times, and a convenient location, you can trust PC Fix London to get your laptop back in working order. You can reach us at 020 7018 7490 or by email at contact@pcfixlondon.com or bring it to the workshop. Don’t let a damaged ASUS ROG laptop screen slow you down – contact PC Fix London today.
Warning:
ASUS ROG Series laptops are high-performance machines with powerful specifications and excellent gaming capabilities. However, like all electronic devices, they are prone to occasional issues, and a damaged screen is one of the most common problems laptop owners face. The screen is an essential component of any laptop, and a damaged display can significantly affect its usability and performance. This article will discuss the causes of ASUS ROG Series laptop screen damage and why PC Fix London is the best choice for repairing your laptop screen.
Symptoms of a Damaged ASUS ROG Series Laptop Screen:
As a laptop user, there are several issues that you may encounter with your device. One of the most common issues is a damaged laptop screen. It can occur due to various reasons, such as physical damage, water damage, or age-related wear and tear. This article will discuss the symptoms of a damaged ASUS ROG series laptop screen.
Flickering Screen:
One of the most common symptoms of a damaged laptop screen is screen flickering. If your ASUS ROG laptop screen is flashing, it could be due to a loose connection, a faulty inverter, or a damaged screen. This issue can be particularly frustrating as it can cause eye strain and headaches.
Dead Pixels:
Dead pixels are a common issue when there is a malfunction in the screen’s liquid crystal display (LCD). Dead pixels are tiny black or white spots on the display screen that do not change when the laptop is turned on or off. If you notice dead pixels on your ASUS ROG laptop screen, it could indicate a damaged screen or a problem with the LCD.
Distorted Images:
If you notice that the images on your laptop screen are distorted, it could indicate a problem with the screen’s resolution. It could be caused by a damaged screen or a problem with the graphics card.
Cracked Screen:
A cracked screen is one of the most apparent symptoms of a damaged laptop screen. If you have accidentally dropped your laptop or hit it against a hard surface, you may have caused damage to the laptop screen. In such cases, the screen will need to be replaced.
No Display:
If you turn on your ASUS ROG laptop and there is no display on the screen, it could indicate a problem with the screen’s backlight or a damaged screen. In such cases, you may hear the laptop’s fan running, but there will be no display on the screen.
There are several common causes of ASUS ROG Series laptop display issues, including:
Physical damage: One of the most common causes of display issues in ASUS ROG laptops is physical damage to the screen. It can occur due to accidental drops, impact, or pressure on the screen.
Graphics card problems: The graphics card in the laptop may experience issues, causing problems with the display. It could be due to outdated drivers, overheating, or a hardware malfunction.
Loose or damaged display cables: The cables connecting the display to the laptop’s motherboard may become loose or damaged, leading to issues with the display. It can happen due to regular wear and tear or accidental damage.
Software problems: Sometimes, software issues can cause problems with the display, such as incorrect resolution settings or compatibility issues with specific applications.
Malfunctioning backlight: The backlight that illuminates the display may malfunction, causing dim or uneven lighting on the screen. It can be due to a faulty backlight component or a damaged power source.t
Loose or damaged cable connections: The cables that connect the laptop screen to the motherboard can become loose or damaged over time, resulting in display issues.
Driver problems: Outdated or corrupted display drivers can cause issues with the screen display, including flickering, pixelation, and colour distortion.
Physical damage: Accidental drops or impacts can cause physical damage to the screen, resulting in cracked or broken displays.
Overheating: Overheating the laptop can cause damage to the screen and other internal components, resulting in display issues.
Malware or viruses: Malware or viruses can cause various issues with the laptop’s performance, including display issues.
It is essential to identify the cause of the display issue before attempting to fix it to avoid causing further damage to the laptop.
To keep your ASUS ROG laptop display in good condition and prevent frequent repairs, you can take the following steps:
Handle your laptop carefully: Be careful while handling your computer, especially while opening and closing the lid. Don’t put unnecessary pressure on the screen.
Use a laptop sleeve or case: Invest in a good-quality one to protect your laptop from external damage during transportation.
Keep the laptop clean: Dust and dirt particles can accumulate on the screen, affecting its clarity. Use a microfiber cloth to wipe the screen regularly.
Adjust the screen brightness: High brightness levels can strain the display, causing it to malfunction. Adjust the screen brightness to a comfortable level.
Avoid exposure to extreme temperatures: High temperatures can cause the laptop display to become discoloured or damaged. Avoid exposing your laptop to direct sunlight or powerful heat sources.
Update your graphics card driver: Outdated drivers can cause display issues. Keep your graphics card drivers up to date.
Avoid liquid spills: Liquid spills on the laptop can cause severe damage to the display. Be careful while using liquids near your computer.
Following these steps, you can keep your ASUS ROG laptop display in good condition and avoid frequent repairs.
ASUS ROG laptop screen damage and repair: Why PC Fix London?
If you’re experiencing ASUS ROG laptop screen damage, you’ll want to find a reliable repair service to fix the issue and get your laptop back in working order. While many repair services are available, PC Fix London offers several benefits, making them an excellent choice for ASUS ROG laptop screen repairs.
Experienced technicians: PC Fix London employs professional technicians who repair many laptop issues, including ASUS ROG screen damage. They have the necessary tools and expertise to diagnose and fix problems quickly and effectively.
Quality parts: PC Fix London uses only high-quality replacement parts for their repairs. It ensures that your ASUS ROG laptop screen is restored to its original condition and that the repair will last a long time.
Competitive pricing: PC Fix London offers the best pricing for their ASUS ROG laptop screen repair services and no fix, no fee guarantee. They understand that laptop repairs can be expensive and strive to offer fair pricing that won’t break the bank.
Quick turnaround time: PC Fix London offers fast turnaround times for laptop repair services. It means you won’t have to be without your ASUS ROG laptop for an extended time and can get back to using it as soon as possible.
Convenient location: PC Fix London is located in the heart of London, making it suitable for those who live or work there. You can quickly drop off your ASUS ROG laptop for repairs and pick it up once the repairs are complete.
Overall, PC Fix London offers reliable and convenient ASUS ROG laptop screen repair options. With experienced technicians, quality parts, high competitive and best pricing, quick turnaround times, and a convenient location, you can trust PC Fix London to get your laptop back in working order. You can reach us at 020 7018 7490 or by email at contact@pcfixlondon.com or bring it to the workshop. Don’t let a damaged ASUS ROG laptop screen slow you down – contact PC Fix London today.
Warning:
Please note that the guideline instructions provided may not always apply to the symptoms your computer is experiencing. Sometimes, symptoms or behavior can be the same, but the underlying reason or fault can be completely different.
The fastest way we can assist customers is by bringing computers to our workshop, where technicians have the tools to diagnose faults accurately. After checks, if parts are found to be faulty or damaged, we proceed to replace them with high-quality original parts.
No appointments are required; you can drop off your computer at our workshop during working hours.
If you have more queries about our laptop repair and upgrade services, please feel free to contact us at 020 7018 7490 or email us at contact@pcfixlondon.com


Recent Comments